ReelUp tracking pixel Read the Privacy Policy
product - || true

Dasta Knob & Pull Bar

Regular Price: $40
Precio normal

Members save $8Join Now

3YEARS
Tags: Brass Handle Handle not on discount

Smooth, brushed brass finish enhances cabinet and wardrobe doors with timeless elegance — perfect for both traditional and modern interiors.

15
All Bestseller
18
All Non Discounted Products
15
All Products Excluding Switches
18
Best Selling Products
Cabinet Handles
15
Cabinet Hardware
Cabinet Pull Bars
15
Home Hardware
12
Indoor Lights
Interior
15
Knobs
15
New Arrival
18
New Hardware Arrivals
18
Newest Products
Productos
15
Pull Bars
Shop by Room
Todos los productos
18
Estimated arrival: , Order within .

The estimated shipping time is a suggestion based on current material availability. Customized orders may take up to 15 additional days for custom fabrication and material sourcing.

Request call back

Our design concierge will call you within 2 minutes.

    Thank you! We've received your request.
    Why you'll love it
    1. Effortless grip for smooth handling
    2. Complements both modern and classic decor
    3. Resists tarnish for lasting brilliance
    Product Specifications

    Dimensions:
    T Knob: L2.4"(6cm) x H1.4"(3.5cm)
    Pull Bar: L6.2"(15.7cm) x H1.4"(3.5cm)
    Pull Bar: L7.4"(18.9cm) x H1.4"(3.5cm)
    Pull Bar: L8.7"(22.2cm) x H1.4"(3.5cm)
    Pull Bar: L11.2"(28.6cm) x H1.4"(3.5cm)
    Pull Bar: L15"(38.2m) x H1.4"(3.5cm)

    Hole Spacing:
    Hole to Hole: L3.8"(9.6cm)
    Hole to Hole: L5"(12.8cm)
    Hole to Hole: L6.3"(16cm)
    Hole to Hole: L8.8"(22.4cm)
    Hole to Hole: L12.6"(32cm)

    Material: Brass
    Finish: Bronze
    Weight: 44g, 121g, 142g, 162g, 203g, 315g
    Grip Style: Smooth
    Application: Cupboard, Cabinets, Drawer, Wardrobe, Doors

    Installation Guide

    Details

    Mounting Type:
    Designed for surface installation on doors, drawers, or cabinetry. Refer to your product’s dimensions for proper placement and drilling points.

    Tools You May Need
    • Screwdriver (Phillips and flathead)
    • Drill and drill bits
    • Allen key 
    • Tape measure and pencil
    • Level
    • Chisel (for mortice lock installation)
    • Screws and anchors
    • Safety goggles
    A. Cabinet Hardware

    (Pull Bars, Knobs, Drawer Pulls)

    Step 1: Mark Drilling Points

    Use a measuring tape and pencil to mark hole placements. For uniformity across multiple pieces, a template is recommended.

    Step 2: Drill Holes

    Drill through the surface using a bit that matches the provided screw diameter. Keep the drill straight to avoid angle misalignment.

    Step 3: Mount the Hardware

    Insert screws from the inside of the cabinet or drawer. Secure the hardware on the front face and tighten with a screwdriver — avoid overtightening.

    Step 4: Align and Inspect

    Confirm straightness and spacing before fully securing.

    B. Door Handle Hardware
    B1: Thumb Lock or Dummy Handle

    Step 1: Confirm Orientation

    Determine left-hand or right-hand door swing. Adjust handle orientation as needed.

    Step 2: Mark Installation Height

    Mark desired height (typically 36–38 inches from the floor to the handle center). Align the mounting plate accordingly.

    Step 3: Drill and Attach

    Drill pilot holes and secure the backplate and handle with the included screws. For dummy handles, install directly without latch mechanisms.

    Step 4: Install Strike Plate (Thumb Lock Only)

    Mark latch location on the door frame. Chisel a recess if needed and screw the strike plate into place.

    B2: Mortice Lock Handle

    Step 1: Cut Mortice Pocket

    Using a chisel and drill, create a cavity in the door edge for the lock body. Use provided measurements for accuracy.

    Step 2: Insert Lock Body

    Fit the lock body into the mortice cavity and attach it using screws through the faceplate.

    Step 3: Install Handle

    Align the spindle through the lock and attach handles on both sides. Tighten using a screwdriver or included Allen key.

    Step 4: Install Cylinder (If Applicable)

    Insert the key cylinder into the designated slot. Secure with the cylinder screw from the door edge.

    Step 5: Mount Strike Plate

    Align with the latch mechanism and secure the strike plate to the door frame.

    Important Tips
    • Always double-check measurements before drilling.
    • Use a level for consistent handle alignment across multiple units.
    • If unfamiliar with mortice installation, consult a locksmith or professional.
    • Ensure all moving parts operate smoothly before tightening screws.
    • Dummy handles are for decorative or pull-only use — they do not engage latches or locks.
    Need Help?

    Have questions about installation or compatibility?
    Email us at: help@residencesupply.com

    Make it your own

    Our in-house technicians can customize any order!

    Popular Changes:

    • Hanging length
    • Material color or paint
    • Emitting color
    • Dimmable add-on
    • Add or reduce size/dimension
    • Redesign the entire lighting fixture to your suggestion

    What We Do:

    • Make minor adjustments above
    • Create CAD drawings for your custom design
    • 3D render the product into your photo

    Speak with an expert on live chat or call us now from 9AM EST to 6PM EST.

    Alternatively, leave us an email.

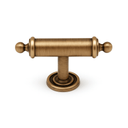
    Dasta is made from premium brass and features a classic cylindrical design with decorative end caps and a smooth, brushed finish. Ideal for cabinet doors, wardrobe doors, and drawers, its timeless style enhances both traditional and modern interiors.


    WHY YOU WILL LOVE IT:

    • Made from premium brass for durability and a luxurious finish.
    • Classic cylindrical shape with decorative end caps.
    • Smooth, brushed brass finish for a sophisticated look.
    • Robust brass construction ensures long-lasting use.